When trying to migrate from Windows 7 to 8.1 I learned that I would lose my installed applications. This was especially frustrating because I knew from the upgrade assistant that there is an option to keep them – it is just not available for my configuration. And even the official guide states that I would have to reinstall all apps.
The solution was: First migrate to Windows 8 (the option to keep your apps is available here) and then to 8.1 (which again allows you to keep your apps). My system is up and running and I did not have to reinstall anything. Voilà! The only question which remains is: why?
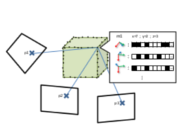
The final piece of my Master in Computer Science is the thesis “Monocular SLAM for Context-Aware Workflow Assistance”. The abstract is included below:
In this thesis, we propose the integration of contextual workflow knowledge into a SLAM tracking system for the purpose of procedural assistance using Augmented Reality. Augmented Reality is an intuitive way for presenting workflow knowledge (e.g. main- tenance or repairing) step by step but requires sophisticated models of the scene appear- ance, the actions to perform and the spatial structure. For the latter one we propose the integration with SLAM (Simultaneous Localization And Mapping) operating on images of a monocular camera. We first develop a stand-alone SLAM system with a point cloud as map representation which is continuously extended and refined by triangulations obtained from new view points using a three-step keyframe insertion procedure. In a second step, we integrate contextual knowledge which is automatically obtained from reference recordings in a so- called offline mapping step. This allows the tracking not only to cope with but actively adapt to changes in the environment by explicitly including them in the tracking model. To aid the data acquisition and to merge multiple tracking models into a single one, we propose a novel method for combining offline acquired maps which is independent of the spatial structure as opposed to ICP (Iterative Closest Point). We show typical tracking results and evaluate the single components of our system by measuring their performance when exposed to noise.
I wrote my thesis in Prof. Stricker’s Augmented Vision group and was supervised by Nils Petersen.
@mastersthesis{Hasper2014,
author = {Hasper, Philipp},
school = {TU Kaiserslautern},
title = {{Monocular SLAM for Context-Aware Workflow Assistance}},
type = {Masterthesis},
year = {2014}
}
I’ve recently migrated a project from Eigen2 library to Eigen3 based on the very useful staged migration path.
Here are two regular expressions which came in really handy. Of course you have to manually check the result but they save a lot of time.
/*
 * Using the new linear solver interface
 */

// Regular expression for finding
([^\S\n]*)([^\s]*)\.solve\(([\s]*)(.*?)([\s]*),([\s]*)\&(.*?)([\s]*)\)\;
// Regular expression for replacing
$1$7 = $2.solve\($4\);
/*
 * Use the static way for map creation.
 * Does not work with all types
 */

// Regular expression for finding
Eigen::Map<(.*?)>\(
// Regular expression for replacing
$1::Map\(
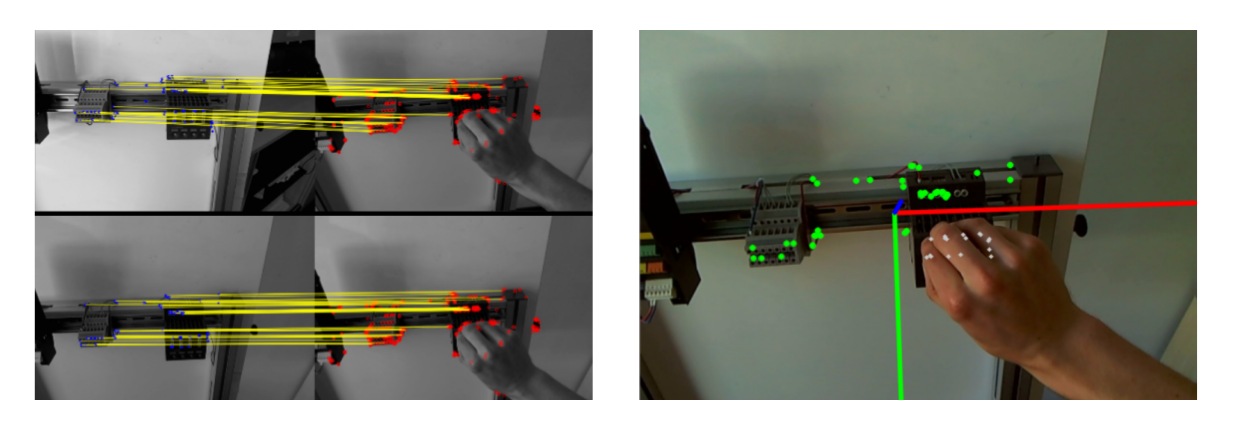
Drawing epipolar lines in OpenCV is not hard but it requires a sufficient amount of code. Here is a out-of-the-box function for your convenience which only needs the fundamental matrix and the matching points. And it even has an option to exclude outliers during drawing!
#include <opencv2/core/core.hpp>
#include <opencv2/highgui/highgui.hpp>
#include <opencv2/calib3d/calib3d.hpp>
#include <opencv2/imgproc/imgproc.hpp>
/**
 * \brief	Compute and draw the epipolar lines in two images
 *			associated to each other by a fundamental matrix
 *
 * \param title			Title of the window to display
 * \param F					Fundamental matrix
 * \param img1			First image
 * \param img2			Second image
 * \param points1		Set of points in the first image
 * \param points2		Set of points in the second image matching to the first set
 * \param inlierDistance			Points with a high distance to the epipolar lines are
 *								not displayed. If it is negative, all points are displayed
 **/
template <typename T1, typename T2>
static void drawEpipolarLines(const std::string& title, const cv::Matx<T1,3,3> F,
							  const cv::Mat& img1, const cv::Mat& img2,
							  const std::vector<cv::Point_<T2>> points1,
							  const std::vector<cv::Point_<T2>> points2,
							  const float inlierDistance = -1)
{
	CV_Assert(img1.size() == img2.size() && img1.type() == img2.type());
	cv::Mat outImg(img1.rows, img1.cols*2, CV_8UC3);
	cv::Rect rect1(0,0, img1.cols, img1.rows);
	cv::Rect rect2(img1.cols, 0, img1.cols, img1.rows);
	/*
	 * Allow color drawing
	 */
	if (img1.type() == CV_8U)
	{
		cv::cvtColor(img1, outImg(rect1), CV_GRAY2BGR);
		cv::cvtColor(img2, outImg(rect2), CV_GRAY2BGR);
	}
	else
	{
		img1.copyTo(outImg(rect1));
		img2.copyTo(outImg(rect2));
	}
	std::vector<cv::Vec<T2,3>> epilines1, epilines2;
	cv::computeCorrespondEpilines(points1, 1, F, epilines1); //Index starts with 1
	cv::computeCorrespondEpilines(points2, 2, F, epilines2);

	CV_Assert(points1.size() == points2.size() &&
			  points2.size() == epilines1.size() &&
			  epilines1.size() == epilines2.size());

	cv::RNG rng(0);
	for(size_t i=0; i<points1.size(); i++)
	{
		if(inlierDistance > 0)
		{
			if(distancePointLine(points1[i], epilines2[i]) > inlierDistance ||
				distancePointLine(points2[i], epilines1[i]) > inlierDistance)
			{
				//The point match is no inlier
				continue;
			}
		}
		/*
		 * Epipolar lines of the 1st point set are drawn in the 2nd image and vice-versa
		 */
		cv::Scalar color(rng(256),rng(256),rng(256));

		cv::line(outImg(rect2),
			cv::Point(0,-epilines1[i][2]/epilines1[i][1]),
			cv::Point(img1.cols,-(epilines1[i][2]+epilines1[i][0]*img1.cols)/epilines1[i][1]),
			color);
		cv::circle(outImg(rect1), points1[i], 3, color, -1, CV_AA);

		cv::line(outImg(rect1),
			cv::Point(0,-epilines2[i][2]/epilines2[i][1]),
			cv::Point(img2.cols,-(epilines2[i][2]+epilines2[i][0]*img2.cols)/epilines2[i][1]),
			color);
		cv::circle(outImg(rect2), points2[i], 3, color, -1, CV_AA);
	}
	cv::imshow(title, outImg);
	cv::waitKey(1);
}

template <typename T>
static float distancePointLine(const cv::Point_<T> point, const cv::Vec<T,3>& line)
{
	//Line is given as a*x + b*y + c = 0
	return std::fabsf(line(0)*point.x + line(1)*point.y + line(2))
			/ std::sqrt(line(0)*line(0)+line(1)*line(1));
}
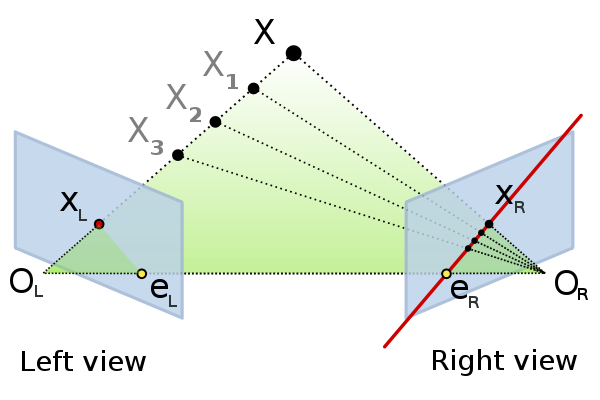
The most important concepts of epipolar geometry. Author: Arne Nordmann, CC BY-SA 3.0
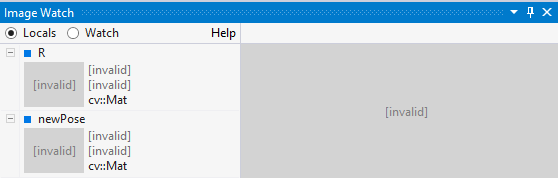
Quick tip: If you notice that after the installation of Visual Assist your Visual Studio Image Watch plug-in stopped working and all your matrices are marked with the tag [invalid], then just disable the VA Step Filter:
VAssistX → Visual Assist Options → Debugger
Uncheck the field that says “Enable VA Step Filter”
Update: According to a comment, this does no longer work due to cryptographical authentication!
I often use the Android emulator to check my apps with different display configurations and to stress-test them. But the problem is that it is really slow on my development laptop. So I installed the Android emulator on my desktop PC running Windows and connect to it over my LAN. The major advantage is that you can continue using your development machine while a “server” deals with emulating – one could even emulate several devices at once and still continue programming.
The approach in a nutshell: Forward the emulator’s port so that it is accessible in the local network. Then connect the ADB to it.
On your desktop – the “server”:
Store the executable of Trivial Portforward on the desktop system (e.g. directly in C:\trivial_portforward.exe).
Create a virtual device to emulate (HowTo) and name it “EmulatedAndroid”.
Create a batch file:
<your-android-sdk-path>\tools\emulator -avd EmulatedAndroid &
echo 'On the development machine: adb kill-server and then: adb connect <desktop-pc-name>:5585'
C:\trivial_portforward 5585 127.0.0.1 5555
If you execute this batch file on your desktop PC, it will open the emulator with the specified virtual device.
Now on your laptop – the “client”:
Now – given that both systems are in the same network – you can connect to the emulator from your laptop by typing in a terminal:
Now you can upload apps, access the logcat and execute adb commands on your remote emulator like on any other Android device. And all without performance impairments on your workstation.
If you are experiencing communication losses, increase the emulator timeout in the eclipse settings to maybe 5000 ms (Window → Preferences → Android → DDMS → ADB connection time out (ms)).
Every once in a while I start a new computer vision project with Android. And I am always facing the same question: “What do I need again to retrieve a camera image ready for processing?”. While there are great tutorials around I just want a downloadable project with a minimum amount of code – not taking pictures, not setting resolutions, just the continuous retrieval of incoming camera frames.
So here they are – two different “Hello World” for computer vision. I will show you some excerpts from the code and then provide a download link for each project.
Pure Android API
The main problem to solve is how to store the camera image into a processable image format – in this case the android.graphics.Bitmap .
@Override
public void surfaceChanged(SurfaceHolder holder, int format, int width,
int height) {
if(camera != null) {
camera.release();
camera = null;
}
camera = Camera.open();
try {
camera.setPreviewDisplay(holder);
} catch (IOException e) {
e.printStackTrace();
}
camera.setPreviewCallback(new PreviewCallback() {
public void onPreviewFrame(byte[] data, Camera camera) {
System.out.println("Frame received!"+data.length);
Size size = camera.getParameters().getPreviewSize();
/*
* Directly constructing a bitmap from the data would be possible if the preview format
* had been set to RGB (params.setPreviewFormat() ) but some devices only support YUV.
* So we have to stick with it and convert the format
*/
int[] rgbData = convertYUV420_NV21toRGB8888(data, size.width, size.height);
Bitmap bitmap = Bitmap.createBitmap(rgbData, size.width, size.height, Bitmap.Config.ARGB_8888);
/*
* TODO: now process the bitmap
*/
}
});
camera.startPreview();
}
Notice the function convertYUV420_NV21toRGB8888() which is needed since the internal representation of camera frames does not match any supported Bitmap format.
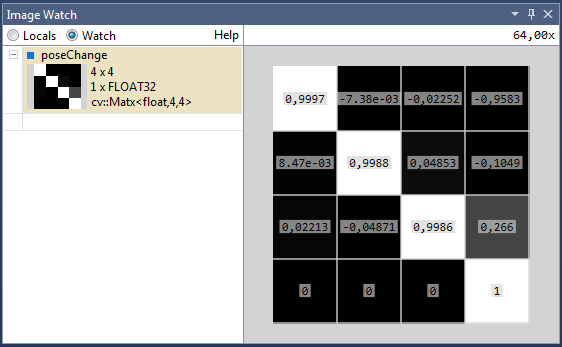
When developing for/with OpenCV using Visual Studio, the Image Watch plug-in is very useful. However, it does not support the better-typed cv::Matx types (e.g. cv::Matx33f which is the same as cv::Matx<float,3,3> ). Here is how I made use of Visual Studio’s debugger type visualizers to customize the plugin:
Go to the folder <VS Installation Directory>\Common7\Packages\Debugger\Visualizers\ and create a new file called Matx.natvis
You do not even have to restart Visual Studio. Just start a new debugging session and you can look at your cv::Matx types in a nice little graphical window.
For a couple of years I have used OpenCV for Android and developed with Eclipse. But a while back I started a bigger project which will run on stationary machines so I began to learn how to use Visual Studio 2013. The integration of OpenCV 2.4.8 was fairly easy and I was quickly able to run my code.
(Just as a service since the library names on the given site are outdated – here are all the names for easy copying:)
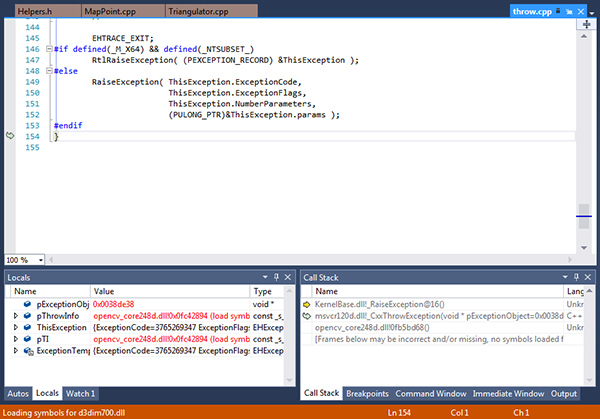
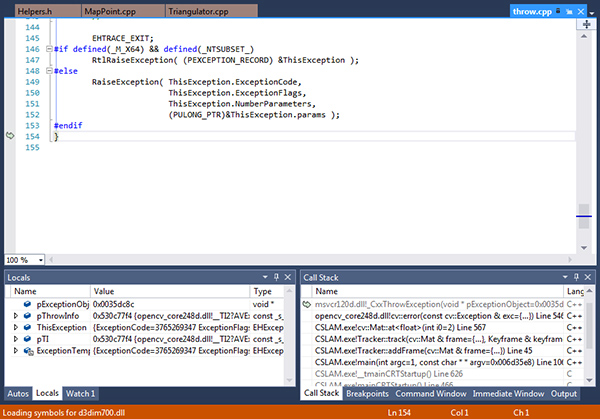
But then I experienced a strange behaviour: Every time an exception or assertion was thrown inside of an OpenCV method, I would have no clue what happened since the call stack had only four entries: Something about KernelBase.dll, msvcr120d.dll, opencv_core248.dll and the last one “Frames below may be incorrect and/or missing, no symbols loaded for opencv_core248d.dll“.
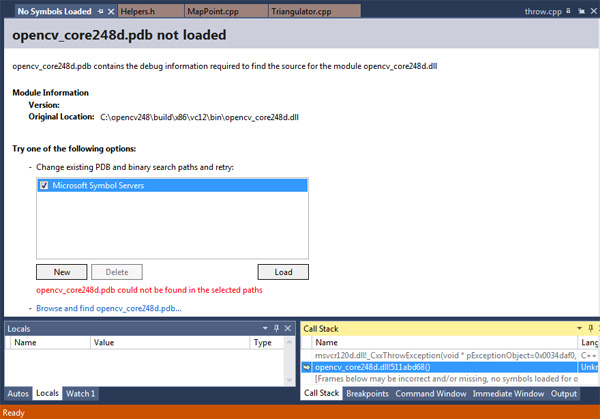
Upon further examination (clicking on the opencv_core248d.dll entry) Visual Studio revealed that the .pdb file was missing: it said “opencv_core248d.pdb not loaded” and “opencv_core248d.pdb could not be found in the selected paths“.
I quickly found some .pdb files in C:\opencv248\build\x86\vc12\staticlib but since they did not match the .dlls, they did not work either. So what to do? Essentially we have to build OpenCV ourselves but we will leave out any 3rd party libraries since we only want to debug, not to have fast code (of course you can build a complete version but I didn’t do it in order to save time). In the following I will describe only the basic steps, for a full documentation including pictures and how to add performance-improving 3rd party libraries visit the original tutorial.
I assume you have an OpenCV copy, e.g. under C:\opencv248\ . The folder contains a build and a sources folder.
Start CMake (cmake-gui). It should be in your start menu. Enter C:\opencv248\sources in the first field (“Where is the source code:”) and a freely chosen path e.g. C:\opencv248\ownBuild\ in the second one.
Press “Configure” and select your compiler – for Visual Studio 2013 32-bit it would be “Visual Studio 12”. I then ignored a warning about Java AWT and python missing and pressed the “Generate” button.
Wait for the process to finish, then open C:\opencv248\ownBuild\OpenCV.sln. Build both Debug and Release configuration which should take some time.
After the build, go into C:\opencv248\ownBuild\bin. There are two folders containing all files you will need. Now you have two options:
Remove any directory previously leading to the OpenCV dlls from your PATH (e.g. in my case I removed C:\opencv248\build\x86\vc12\bin ) and then add C:\opencv248\ownBuild\bin\Debug and C:\opencv248\ownBuild\bin\Release to your PATH.
Remove any directory previously leading to the OpenCV dlls from your PATH. Then move all .dll and .pdb files from the Debug and Release folder to a “save” place, e.g. C:\opencv248\debuggableDLL. Add this folder to your PATH, then delete the whole C:\opencv248\ownBuild\ folder to free disk space.
Restart Visual Studio and start a debug session. Now the call stack shows exactly what happened:
Remember to switch back to the optimized dlls when doing performance testing!
If you don’t want to build this all by yourself, here is the result of the build process for Visual Studio 2013 32-bit (the original size of >800MB is compressed to 80MB). To download the archive, activate JavaScript, enter “vsopencv” in the following field and then click the download button. Uncompress the archive with 7-zip and then perform step 6.b.
Here is a small code snippet for OpenCV which reads an image sequence backwards. It needs a sequence of images 000.png, 001.png, 002.png, … in the project’s folder.
Setting the property CV_CAP_PROP_POS_AVI_RATIO to 1 means starting at the end of the sequence (0 = at the beginning).
The property CV_CAP_PROP_POS_FRAMES defines the index of the next image to load. Since it is automatically increased after each image retrieval, we have to decrement it by the value of 2.


